Difficulty: Beginners (basic sewing machine knowledge)
The Granny Square Crochet Cushion Craft Course
By Mandy Cameron
This crochet course has been designed for complete beginners. Learn how to read crochet patterns, basic stitches, how to make granny squares, and how to turn the granny squares into a cushion cover, wristlet or cowl.
Crochet Craft Course
Follow along with Mandy Cameron to learn the basic techniques, join the squares together, add a decorative edge and join the sides. So, you can create your very own crochet creation to add handmade styles around your home. You can complete any of these projects in just one weekend.
Join the session for free without a craft kit if you wish to use your own materials. Or you can access the full craft kit to support the tutorial for £12.90 (excluding delivery).
Three Crochet Craft Kits to choose from
- Granny Square Crochet Kit - Neutral
- Granny Square Crochet Kit - Purple Haze
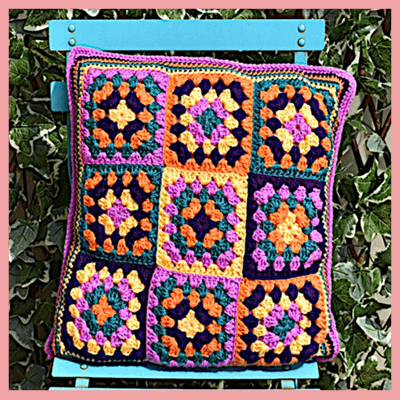
- Granny Square Crochet Kit - Brights
You Will Need:
- KnitPro Lace Blocking Mats
- Clover Quick Locking Stitch Marker
- Korbond Darning Needles
- KnitPro Retractable Beech Wood Tape Measure
- Korbond Craft Scissors 7"
Prefer to read your crochet patterns?
Video Tutorial - Step by Steps
Tutorial Step 1 - Let's Get Started - How to Crochet with Mandy Cameron
Understanding crochet terminology differences between the UK and US is crucial, as terms like double crochet (DC) in the UK correspond to single crochet (SC) in the US. Patterns provide abbreviations for stitches, accompanied by notes offering important instructions. To begin crocheting, master the adjustable slip knot for flexibility, then practice creating even chains while finding a comfortable grip for your hook and yarn. With patience and practice, you'll build confidence in your crocheting skills, paving the way for more complex projects.
Tutorial Step 2 - Basic Stitches - How to Crochet with Mandy Cameron
Patterns provide crucial abbreviations and instructions, making it easier to follow. Starting with a slip stitch, used for joining pieces, you then progress to double crochet and treble crochet stitches, each building on the previous one. Practice and patience are key to mastering these basic stitches, laying the foundation for more intricate crochet projects, such as granny squares for a cushion.
Tutorial Step 3 - Making a Basic Granny Square - How to Crochet with Mandy Cameron
In crocheting a basic granny square, you start with an adjustable slip knot and create a circle with five chains, joining it with a slip stitch. Then, using treble stitches, you form four corners and sides with groups of three trebles separated by chain spaces. Each round builds on the previous one, increasing the square's size. The process involves counting in threes for corners and sides, with each corner consisting of three trebles, separated by chain spaces. By repeating this pattern and adjusting tension, you expand the square. Continuously repeating the process creates larger squares, making it an ideal project for beginners to practice fundamental crochet techniques and tension control.
Tutorial Step 4 - Making a Multi Coloured Granny Square - How to Crochet with Mandy Cameron
In transitioning from a single color to multiple colors for a five-row granny square, each row starts with the same technique as the basic square. After completing a round, you fasten off the current color and join the next by creating an adjustable slip knot and beginning with three chains. The process repeats for each color change, maintaining the pattern of treble stitches and chain spaces for corners and sides. To secure the ends of each color change, you weave them in using a tapestry needle, threading the tail through stitches on the back of the work and cutting off any excess. This ensures a neat finish for the square.
Tutorial Step 5 - Making a Stand Alone Granny Square - How to Crochet with Mandy Cameron
In the "Standalone" traditional granny square, which deviates slightly from the typical design by having upright treble stitches without trios except in the corners, the process begins similarly with a center circle. After joining a new color, treble stitches are worked between the posts of previous stitches, encasing the yarn end as you go along to minimize sewing later. The corners consist of two trebles, a chain space, and two trebles. To further secure the ends, you can weave them in by pulling the yarn through a stitch before crocheting over it. As the rounds progress, the square naturally expands, with the stitch count increasing by three on each side. By following the pattern and keeping track of stitch counts, you can create a neatly expanding granny square without the need for excessive sewing.
Tutorial Step 6 - Using a Blocking Board - How to Crochet with Mandy Cameron
After completing all the rounds of your granny square, you may notice that it appears curved or wonky along the edges. This is where blocking comes in, which involves pinning out your square on foam mats using T-pins to create straight and even angles. Blocking not only helps in making your square truly square but also ensures that your tension is correct. If your square is smaller than the specified size in the pattern, it indicates tighter tension, which can be adjusted by using a larger hook size. Conversely, if the square is larger, a smaller hook size may be needed. Additionally, lightly spritzing the square with water and leaving it to dry for 24 hours after blocking helps set the shape.
Tutorial Step 7 - Joining Granny Squares - How to Crochet with Mandy Cameron
In this section, Mandy demonstrates several methods for joining granny squares together. The invisible method involves sewing the squares together while maintaining the color continuity, resulting in a seamless finish. The oversew technique is suitable for squares with matching colors on the edges, creating a neat and nearly invisible seam. For a decorative touch, the slip stitch join adds texture and visual interest with raised stitches between the squares. Lastly, the crochet join method creates a raised edge along the join, offering a tactile element to the finished project. Each method offers its unique characteristics, allowing you to choose the one that best complements your project's style and requirements.
Tutorial Step 8 - Making the Cushion Cover - How to Crochet with Mandy Cameron
Mandy demonstrates how to assemble your granny squares into a cushion cover. After joining the squares together, I added five rows of double crochet around the perimeter, following the pattern instructions for the corners. Once completed, I inserted the cushion pad and continued crocheting along the final side to enclose the cushion. Alternatively, if you prefer a zip closure, you would leave one side open and sew in a zip instead. Finally, I fastened off the yarn, sewed in the ends, and the cushion cover was complete, ready to add a cozy touch to any space.
Tutorial Step 9 - Making the Wristlets - How to Crochet with Mandy Cameron
How to turn granny squares into wristlets by sewing up the sides to leave a thumb hole and then adding an edging using double crochet stitches. Mandy began by invisibly sewing up one side, leaving a gap for the thumb, and then proceeded to crochet the edging using double crochet stitches around the top opening of the wristlet. They used two different colors for the edging to add a decorative touch, but the color combinations can be customized according to preference. After completing the edging, they fastened off the yarn and repeated the process for the other wristlet.
Tutorial Step 10 - Making the Cowl - How to Crochet with Mandy Cameron
Showcasing how to create a stunning cowl using the granny squares you've already mastered. Opting for the third colorway of the yarn packs and alternated the placement of the squares to add visual interest. With a total of 14 squares, Mandy used the slip stitch method to join them together, adding a contrasting yarn for a vibrant touch. After arranging the squares, they stitched a row of double crochet to bring the edges together. Then, they embellished the cowl with a lovely fan edging, using double crochets and trebles in a simple pattern.
Finally, they demonstrated how to neatly finish the cowl by slip stitching to join and weaving in the ends. This project highlights the versatility of basic crochet stitches and I hope you'll enjoy creating your own unique pieces. Thank you for joining me on this course, and I look forward to seeing your creations!