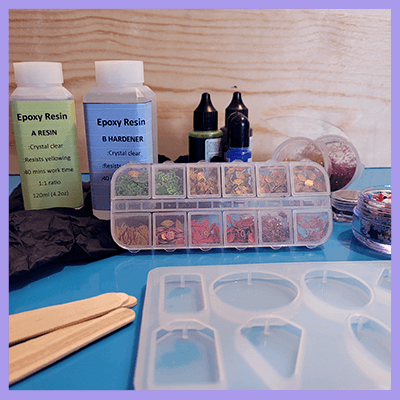
Difficulty: Beginners

The Resin Jewellery Craft Course

By Jill Clay

Have you ever wanted to make resin jewellery? Watch Festival of Japan’s craft course, to learn how to create with resin. Whether you’re an experienced crafter looking to try a new medium, or you’re a total beginner, we know you'll love this course!

Resin Craft Course

Follow along with Jill Clay to learn how to mix resin using the correct quantities of hardener and resin. Plus, you can discover how to add colours and how to avoid bubbles! Once mixed, you can then use a mould to turn your resin into stylish jewellery.

Join the session for free without a craft kit, if you wish to use your own materials. Or you can access the full craft kit to support the tutorial for £34.99 (excluding delivery). That's a saving of £10!

By the end of the course, you will have beautiful resin jewellery to wear, gift or sell!

You Will Need:

  • Mixed Jewellery Bezels
  • Pressed Flowers
  • Double Sided Jewellery Bezels
An example of the final product

First Aid Measures

Eye Contact: Immediately flush with large amounts of water. Remove contact lenses if easy to do. Continue rinsing. Get medical attention.

Skin Contact: Wash with soap and water. If signs/symptoms develop, get medical attention.

Inhalation*: Remove person to fresh air. Get medical attention.

Ingestion: Seek medical attention.

Video Tutorial - Step by Steps

What You'll Need - Festival of Japan Resin Jewellery

An introduction to the basic materials needed to begin working with resin. Listing the essential items required for the resin crafting process and briefly explain their functions.

Safety Tips - Festival of Japan Resin Jewellery

In this video, Jill Clay emphasizes the importance of taking safety precautions seriously and encourages users to prioritize their well-being when working with resin.

Embellishments for Resin - Festival of Japan Resin Jewellery

Jill Clay discusses various materials and embellishments that can be added to resin to create unique designs.

Tutorial Step 1 - Festival of Japan Resin Jewellery

In Step 1, Jill Clay demonstrates the process of preparing resin for crafting projects. They emphasize the importance of safety measures, such as wearing gloves and working in a well-ventilated area. They recommend using silicone or plastic containers for mixing, cautioning against glass containers due to the risk of resin hardening permanently.

Jill instructs on the proper technique for pouring equal parts of resin and hardener into the mixing container, allowing them to settle for accurate measurement. Mixing the components thoroughly with a mixing stick for three minutes is highlighted as a crucial step, ensuring a complete blend. Additionally, Jill advises labeling the lids of the resin and hardener containers to prevent confusion and cross-contamination.

Throughout the process, Jill offers tips, such as observing density differences between resin and hardener and avoiding excessive use of hardener. Overall, by following these steps, crafters can effectively prepare resin for their creative projects.

Tutorial Step 2 - Festival of Japan Resin Jewellery

During the mixing process, it's essential to ensure that you thoroughly incorporate the resin and hardener by reaching the sides and bottom of the mixing container. This is crucial because resin and hardener have different densities, and if they're not mixed well, one may stick to the sides of the pot. Despite your best efforts, bubbles will form in the resin mixture, but there's no need to panic. Even though this resin tends to minimize bubble formation, they're inevitable.

Only advanced users with pressure pots can prevent bubbles entirely. However, you can remove bubbles at a later stage. As you stir, remember to keep stirring gently and consistently, ensuring that you scrape the sides and bottom of the container. Additionally, the wooden mixing stick may introduce some air into the resin, but you can reuse these sticks by allowing them to dry after use.

It's important to follow the manufacturer's recommended mixing time, typically around three minutes, as they understand the properties of their product best. Therefore, always adhere to their guidelines for optimal results.

Tutorial Step 3 - Festival of Japan Resin Jewellery

Once the resin is mixed, it's time to add colors and additives. Pour the mixed resin into separate cups, leaving some clear resin in each cup. Add your desired colors and additives to each cup, adjusting amounts as you like. Stir gently but thoroughly to ensure everything is well incorporated. Keep in mind that bubbles will form, but they'll rise to the surface and can be removed later.

Experiment with different combinations and techniques, mixing colors creatively. Label your cups for easy identification and consider leaving a small spot of each color on the lid. With practice and creativity, you can achieve stunning results with resin art.

Tutorial Step 4 - Festival of Japan Resin Jewellery

When using your silicone mold for the first time, ensure it's clean and free of debris like fluff or dust, especially if you have pets. Sticky tape can help remove any stray hairs. After use, leave the molds to set overnight, then peel out any remaining resin and store them in a plastic bag for cleanliness.

Now, let's dive into the creative part—adding colors and additives to your resin! Experiment with different techniques like adding gilding flakes directly into the mold or pouring alcohol ink for unique effects. You can also use mica powders either mixed into the resin or applied directly onto the mold's surface. Remember to experiment and have fun with different combinations and patterns.

Resin art is all about creativity and exploration. Don't be afraid to try new things and embrace imperfections as part of the process. If you ever need guidance, refer back to the downloadable guide that comes with your kit for helpful tips and techniques. Enjoy your crafting journey!

Tutorial Step 4b - Correcting Issues that Arise - Festival of Japan Resin Jewellery

When working with resin, it's important to address potential issues like tiny bubbles, overfilled molds, and uneven edges. Tiny bubbles can be eliminated using heat from a creme brulee torch or a barbecue lighter held at a safe distance. Overfilled molds can be corrected by carefully filing away excess resin, ensuring proper ventilation to avoid inhaling resin powder. Resin's natural tendency to create a meniscus edge can be managed by gently filing it down with a nail file. Applying a top coat can further refine the finish, hiding imperfections like visible stickers or uneven edges. By following these steps and exercising caution with additional chemicals, you can create flawless resin pieces.

Tutorial Step 5 - Festival of Japan Resin Jewellery

When finishing resin pieces, whether in or out of the mold, careful handling is essential. For larger pieces, a demold spray can aid in extraction, while for smaller ones, it's unnecessary. Patience is key; allow a full 24 to 48 hours for the resin to set properly. Gloves or finger protectors should always be worn to prevent fingerprints.

To remove from the mold, gently pull around the edges, ensuring not to damage the mold for future use. Any remaining imperfections like the meniscus edge can be easily addressed. Once removed, any residue can be cleaned off with tape, leaving the mold ready for future use.

Tutorial Step 6 - Festival of Japan Resin Jewellery

After removing the resin pieces from the mold, the next step is to apply the finishing touches, known as "dorming" or "top coating." This process can be done either in or out of the mold, with the preference being out for easier control. The key is to ensure a level surface, which can be achieved using a spirit level or a homemade doming table.

To begin, mix the resin and apply it evenly to the surface of the piece. This resin acts as a magnifying glass, enhancing the details and making them appear three-dimensional. Care should be taken not to overfill, as excess resin can be removed with a cloth dampened with alcohol.

Once applied, the resin will self-level, creating a smooth and glossy finish. It's essential to allow proper curing time, typically 24 hours for thin pieces and less for thicker ones. Finally, attention to detail is crucial to avoid imperfections such as fingerprints or trapped debris.

Tutorial Step 7 - Festival of Japan Resin Jewellery

After completing the resin pieces, the next step is to turn them into jewelry. This process is straightforward, especially since the pieces already have holes for jump rings. Simply insert a jump ring through the hole and attach it to a cord or chain. Alternatively, you can use keyring components for pieces that aren't suitable for jewelry. Once finished, it's essential to store the jewelry properly to maintain its quality. Jewelry bags are ideal for protecting the resin from damage and preserving its condition over time.

When wearing resin jewelry, avoid spraying perfume directly onto it, as this can damage the surface. If the jewelry gets dirty, it can be cleaned with a gentle window cleaner and a soft cloth to restore its shine. Taking care of resin jewelry will ensure its longevity and keep it looking beautiful for years to come.

Tutorial Step 8 - Festival of Japan Resin Jewellery

It's great to see the resin pieces 24 hours later, taken out of the molds. Remember to handle them gently when removing them from the molds to avoid any damage. As expected, the glitter-heavy piece shows the glitter sinking to the bottom, while most of them have received a lovely domed top coat.

Each piece showcases the various techniques we explored, from using gold foil and mica powder to incorporating other embellishments like oil and spots. Even the quick demonstration piece turned out beautifully, showcasing its intricate details. Now that they're out of the molds and fully cured, they're ready to be transformed into stunning jewelry pieces.

Picture Tutorial - Step by Steps

Tips:

No matter which colourant you choose, do not exceed 5% colourant to the total volume of the resin as this will affect the deli-cate balance needed for the chemical reaction to occur properly and guaranteed heat resistance.

Alcohol ink is a very popular resin colorant that offers gorgeous, rich saturation. It is also the specific colourant needed to create resin petri dish art. Alcohol is of course flammable, so while the resin is non-flammable on its own in its liquid state, this is not the case once alcohol ink is added to the mix. For that reason, a torch should not be used on resin that contains alcohol ink. Instead use a heat gun.

Mica Powder mixes in seamlessly. Mica Powder can also be brushed onto your mould wherever required prior to pouring.

Acrylics: You can use acrylic paint with the resin, but because acrylic is a plastic and has a matte finish, it tends to take away the glossiness of the resin. Generally, people who work with resin like the glossiness of it and will want to preserve that look.

Oil paint does NOT mix in well with the resin. We would suggest using one of the other options above.

Clean your tools with alcohol and paper towels or baby wipes. Small bits of resin can be left to set fully and then removed with sticky tape.

Step 1

Step 1

Prepare your work area by making sure that your area is protected by a cloth or paper, as resin will stick to everything except silicone and some plastics. You can use a silicone mat, such as a baking mat to work on. It is important that you have good ventilation in the room where you are working. You must always wear gloves to protect your skin. You can wear a mask, but this down to personal choice. When working with resin try to have all your materials ready. Make sure your mould is clean and lint free, have the chosen colours, pigments, glitters etc ready. You should also have a level working area as resin will self-level.

Step 2

Step 2

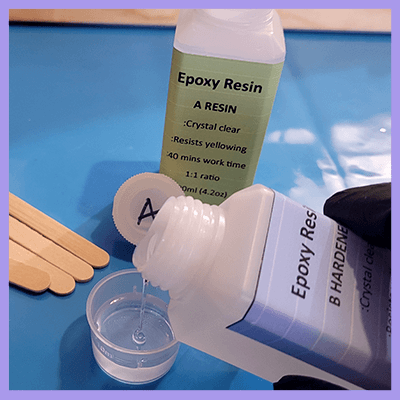
Resin has a limited working time (our resin is 40 minutes). After this time, it becomes too thick. Using marked measuring cups (silicone if possible) measure the resin and hardener equally by volume not weight.

Step 3

Step 3

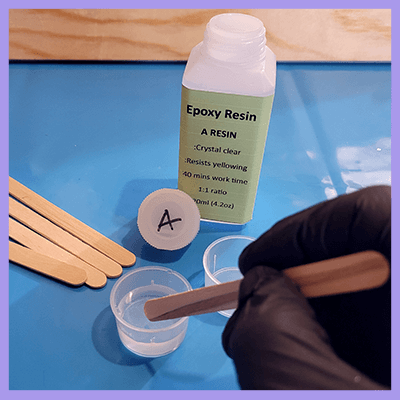
Mix the resin for 4 minutes, using your wooden stick and stir slowly while continuing to scrape the sides and bottom of the cup. Leave the mixed resin to one side to allow bubbles to come to the surface.

Step 4

Step 4

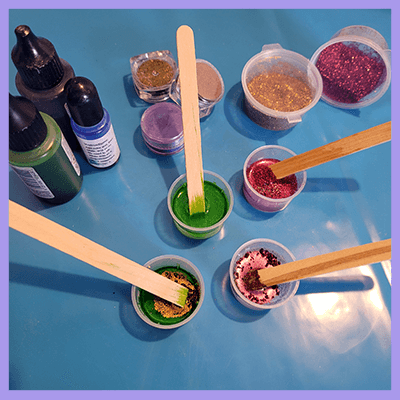
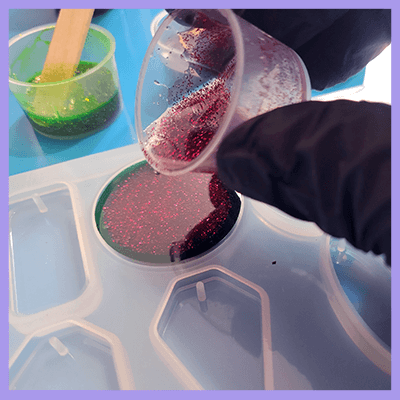
Separate the mixed resin into as many cups as required. Using pigments, inks and glitters mix your chosen colours. Dry additions have no limit to the amount that you can add. Liquids must be NO MORE than 5% per volume. Make sure all additions are mixed thoroughly and try to avoid more bubbles.

Step 5

Step 5

You can now add the resin to the mould. Add by pouring, dripping or use the mixing stick to add drop by drop so that it is level with the top.

Step 6

Step 6

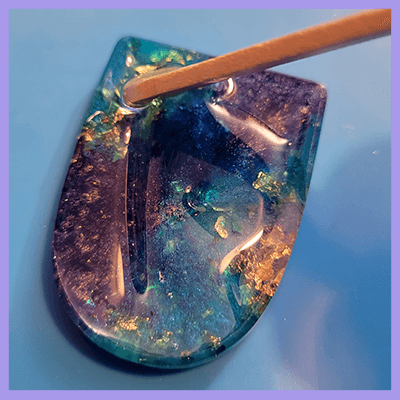
You must allow 24 hours for the resin to cure. Demould carefully, wearing gloves if possible to prevent fingerprints on the surface of the resin. Gently remove the resin by loosening all the way around the edge, then pop out. Resin pieces are at their best when they have a topcoat or doming coat. This magnifies the beauty of the colours, inserts etc. This is done by placing the resin onto a level surface. Add resin drop by drop to the surface to create a gentle dome. Be careful to do this drop by drop so the resin doesn’t overflow to the edges. Make sure that bubbles are allowed to rise to the surface and pop them with a gentle flame (BBQ lighter etc). Be careful NOT to get close to the mould as it may burn the silicone. Cover with a box and allow 24 hours to set.

Step 7

Step 7

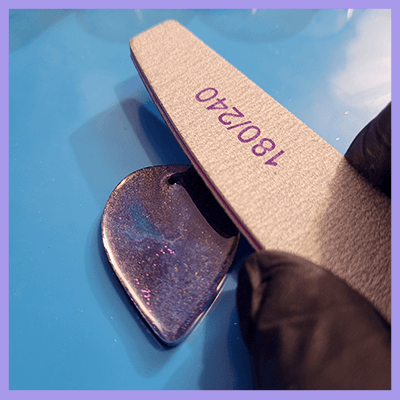
If the resin has any rough edges you will need to sand these down very gently. This can be done using nail files designed for silicone nails. When sanding resin you MUST wear a mask. Use the file to smooth any rough or sharp edges.

Step 8

Step 8

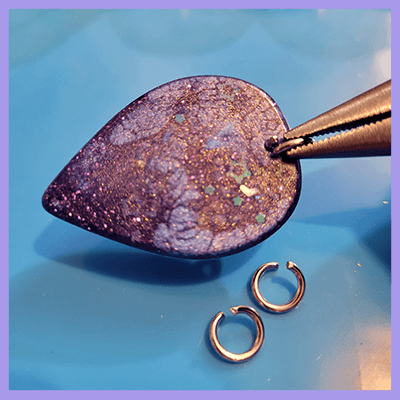
You can now turn your resin into finished pieces by adding jump rings that go through the holes that the mould has made. If your topcoat has filled in these holes you can use a small hand drill or awl to open them up

Finished Resin

Finished Resin

Here are a few examples of the finished resin pieces.

Disclaimer

For full technical data information email us on: [email protected] for an email copy. This resin is safe to use indoors and has very little odour. None of our resins contain solvents or VOCs (volatile organic compounds - VOC's are responsible for the odour, scents, and perfumes as well as pollutants.) and do not give off any nasty fumes. However, we do recommend working in a well-ventilated space. You do not need to wear a respirator when pouring epoxy resin, but you must wear gloves or a suitable barrier cream to protect your hands. However, should you need to sand a piece it is recommended to wear a protective mask and to avoid breathing in any particles. Use according to these instructions.

We do NOT recommend ANY resin if pregnant or breast feeding. The maximum temperature that cured the resin can tolerate after 14 days is 200F or 93C. At temperatures as high as that, the cured pieces may become a little flexible but once they cool off, they will harden up once again. Typically, the heat generated from a hot mug will not damage the resin surface on a coaster. NEVER pour mixed resin down into your sink or into waterways. Clean using towels and alcohol, if still wet or allow it to set fully for easy disposal of leftover resin.

  •    
     
     
  •    
     
     
  •    
     
     
  •    
     
     
  •    
     
     
  •    
     
     
  •    
     
     
  •    
     
     
  •    
     
     
  •