 Watch
Watch Guide
Guide Craft Courses
 Blog
Blog


Resin Craft Course
Have you ever wanted to make resin jewellery? Watch Festival of Japan’s craft course, to learn how to create with resin. Whether you’re an experienced crafter looking to try a new medium, or you’re a total beginner, we know you'll love this course!
Follow along with Jill Clay to learn how to mix resin using the correct quantities of hardener and resin. Plus, you can discover how to add colours and how to avoid bubbles! Once mixed, you can then use a mould to turn your resin into stylish jewellery.
Join the session for free without a craft kit, if you wish to use your own materials. Or you can access the full craft kit to support the tutorial for £34.99 (excluding delivery). That's a saving of £10!
By the end of the course, you will have beautiful resin jewellery to wear, gift or sell!
Difficulty Level
Designed for beginners.
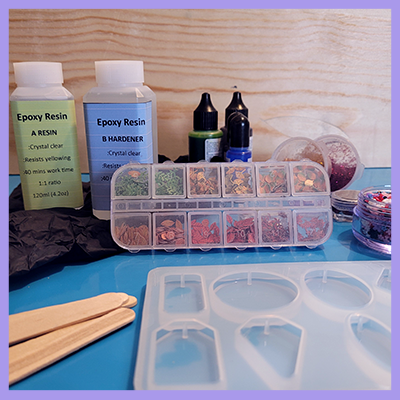
What you'll get in your craft kit
240ml Ultra Clear Epoxy Resin (120ml Resin & 120ml Hardener)– VOC Free with 24 Hour Cure Period
Re-useable 8 Section Silicon Jewellery Mould
Jewellery Jump Rings – Approximately 50
10 x Mini Bottles Assorted Glitter
3 x Bags Assorted Mica Powders
Pair of Gloves
5 x Mixing Pots
5 x Mixing Sticks
Instruction Sheet
Downloadable 40 page booklet with extra tips and ideas
Optional Equipment
Mixed Jewellery Bezels
Pressed Flowers
Double Sided Jewellery Bezels


No matter which colourant you choose, do not exceed 5% colourant to the total volume of the resin as this will affect the deli-cate balance needed for the chemical reaction to occur properly and guaranteed heat resistance. Alcohol ink is a very popular resin colorant that offers gorgeous, rich saturation. It is also the specific colourant needed to create resin petri dish art. Alcohol is of course flammable, so while the resin is non-flammable on its own in its liquid state, this is not the case once alcohol ink is added to the mix. For that reason, a torch should not be used on resin that contains alcohol ink. Instead use a heat gun Mica Powder mixes in seamlessly. Mica Powder can also be brushed onto your mould wherever required prior to pouring. Acrylics: You can use acrylic paint with the resin, but because acrylic is a plastic and has a matte finish, it tends to take away the glossiness of the resin. Generally, people who work with resin like the glossiness of it and will want to preserve that look. Oil paint does NOT mix in well with the resin. We would suggest using one of the other options above. Clean your tools with alcohol and paper towels or baby wipes. Small bits of resin can be left to set fully and then removed with sticky tape.

Step 1
Prepare your work area by making sure that your area is protected by a cloth or paper, as resin will stick to everything except silicone and some plastics. You can use a silicone mat, such as a baking mat to work on. It is important that you have good ventilation in the room where you are working. You must always wear gloves to protect your skin. You can wear a mask, but this down to personal choice. When working with resin try to have all your materials ready. Make sure your mould is clean and lint free, have the chosen colours, pigments, glitters etc ready. You should also have a level working area as resin will self-level.
Step 2
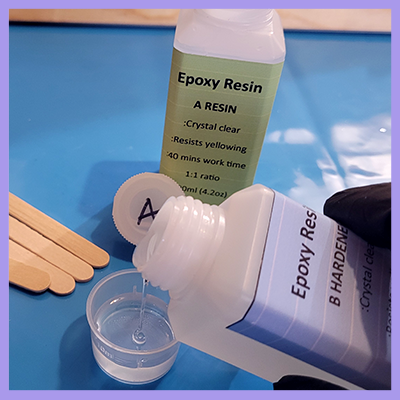
Resin has a limited working time (our resin is 40 minutes). After this time, it becomes too thick. Using marked measuring cups (silicone if possible) measure the resin and hardener equally by volume not weight.
Step 3
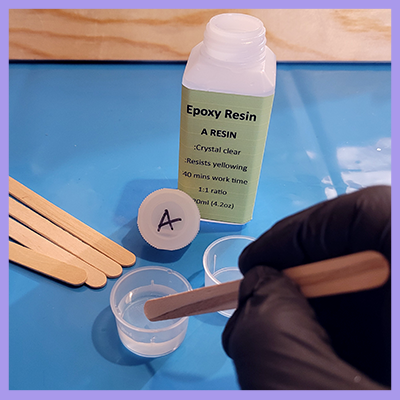
Mix the resin for 4 minutes, using your wooden stick and stir slowly while continuing to scrape the sides and bottom of the cup. Leave the mixed resin to one side to allow bubbles to come to the surface.
Step 4
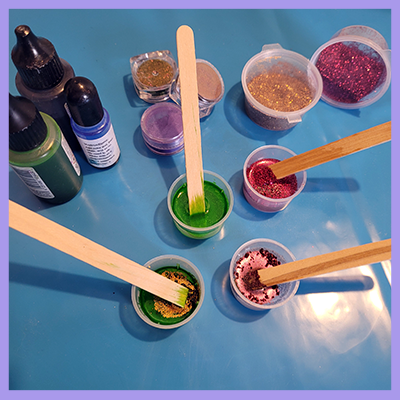
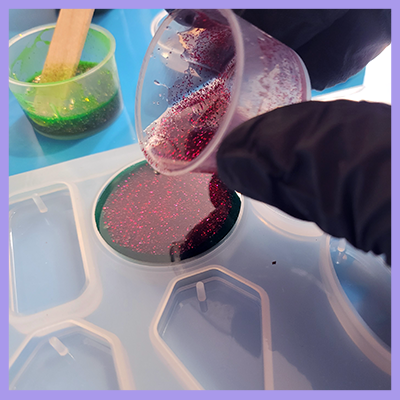
Separate the mixed resin into as many cups as required. Using pigments, inks and glitters mix your chosen colours. Dry additions have no limit to the amount that you can add. Liquids must be NO MORE than 5% per volume. Make sure all additions are mixed thoroughly and try to avoid more bubbles.
Step 5
You can now add the resin to the mould. Add by pouring, dripping or use the mixing stick to add drop by drop so that it is level with the top.
Step 6
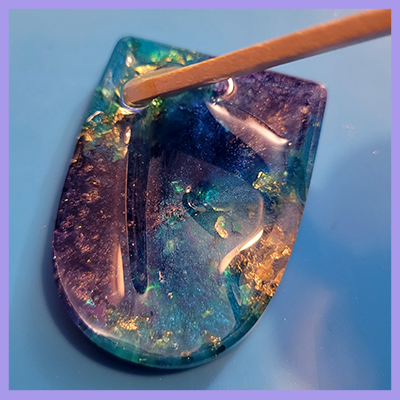
You must allow 24 hours for the resin to cure. Demould carefully, wearing gloves if possible to prevent fingerprints on the surface of the resin. Gently remove the resin by loosening all the way around the edge, then pop out. Resin pieces are at their best when they have a topcoat or doming coat. This magnifies the beauty of the colours, inserts etc. This is done by placing the resin onto a level surface. Add resin drop by drop to the surface to create a gentle dome. Be careful to do this drop by drop so the resin doesn’t overflow to the edges. Make sure that bubbles are allowed to rise to the surface and pop them with a gentle flame (BBQ lighter etc). Be careful NOT to get close to the mould as it may burn the silicone. Cover with a box and allow 24 hours to set.
Step 7
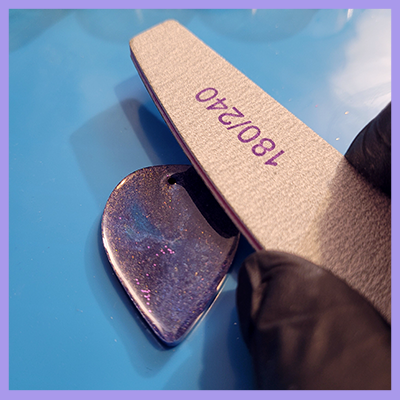
If the resin has any rough edges you will need to sand these down very gently. This can be done using nail files designed for silicone nails. When sanding resin you MUST wear a mask. Use the file to smooth any rough or sharp edges.
Step 8
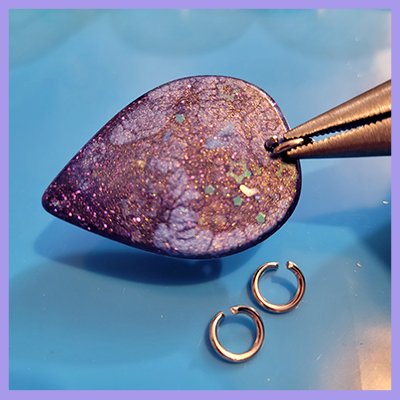
You can now turn your resin into finished pieces by adding jump rings that go through the holes that the mould has made. If your topcoat has filled in these holes you can use a small hand drill or awl to open them up

Finished Resin
Here are a few examples of the finished resin pieces.

Eye Contact: Immediately flush with large amounts of water. Remove contact lenses if easy to do. Continue rinsing. Get medical attention. Skin Contact: Wash with soap and water. If signs/symptoms develop, get medical attention. Inhalation: Remove person to fresh air. Get medical attention. Ingestion: Seek medical attention.

For full technical data information email us on: [email protected] for an email copy. This resin is safe to use indoors and has very little odour. None of our resins contain solvents or VOCs (volatile organic compounds - VOC's are responsible for the odour, scents, and perfumes as well as pollutants.) and do not give off any nasty fumes. However, we do recommend working in a well-ventilated space. You do not need to wear a respirator when pouring epoxy resin, but you must wear gloves or a suitable barrier cream to protect your hands. However, should you need to sand a piece it is recommended to wear a protective mask and to avoid breathing in any particles. Use according to these instructions. We do NOT recommend ANY resin if pregnant or breast feeding. The maximum temperature that cured the resin can tolerate after 14 days is 200F or 93C. At temperatures as high as that, the cured pieces may become a little flexible but once they cool off, they will harden up once again. Typically, the heat generated from a hot mug will not damage the resin surface on a coaster. NEVER pour mixed resin down into your sink or into waterways. Clean using towels and alcohol, if still wet or allow it to set fully for easy disposal of leftover resin.